Setting Up Automated Trading
| Reverse Order Close | Pyramid | What Happens to the Existing Position (If the Same Signal Is Received) | What Happens to the Existing Position (If the Opposite Signal Is Received) | What Happens to the New Signal? |
|---|---|---|---|---|
| True | False | It would be closed | It would be closed | A new signal would open a position if it’s not a close trade. |
| True | True | It would not be closed | It would be closed | A new signal would open a position if it’s not a close trade. |
| False | N/A | It would not close the trade | It would not close the trade | A new signal would open a position if it’s not a close trade. |
Note on TP, SL, TP1, and TP2:
- TP (Take Profit): This is a predefined price level at which a trader decides to close their position to secure profits. When the market reaches this level, the position is automatically closed, locking in the profit.
- SL (Stop Loss): This is a predefined price level where the trader exits a position to limit losses. If the market price moves unfavorably and reaches the SL level, the position is closed to prevent further losses.
- TP1, TP2 (Take Profit Levels): These are multiple take profit levels used in a Partial Exit Strategy. Instead of closing the position entirely at one level (TP), a trader can set different profit-taking points. For example, TP1 might be set at a moderate level to secure part of the profit, and TP2 can be set at a higher level to capture further potential profits while still leaving part of the position open.
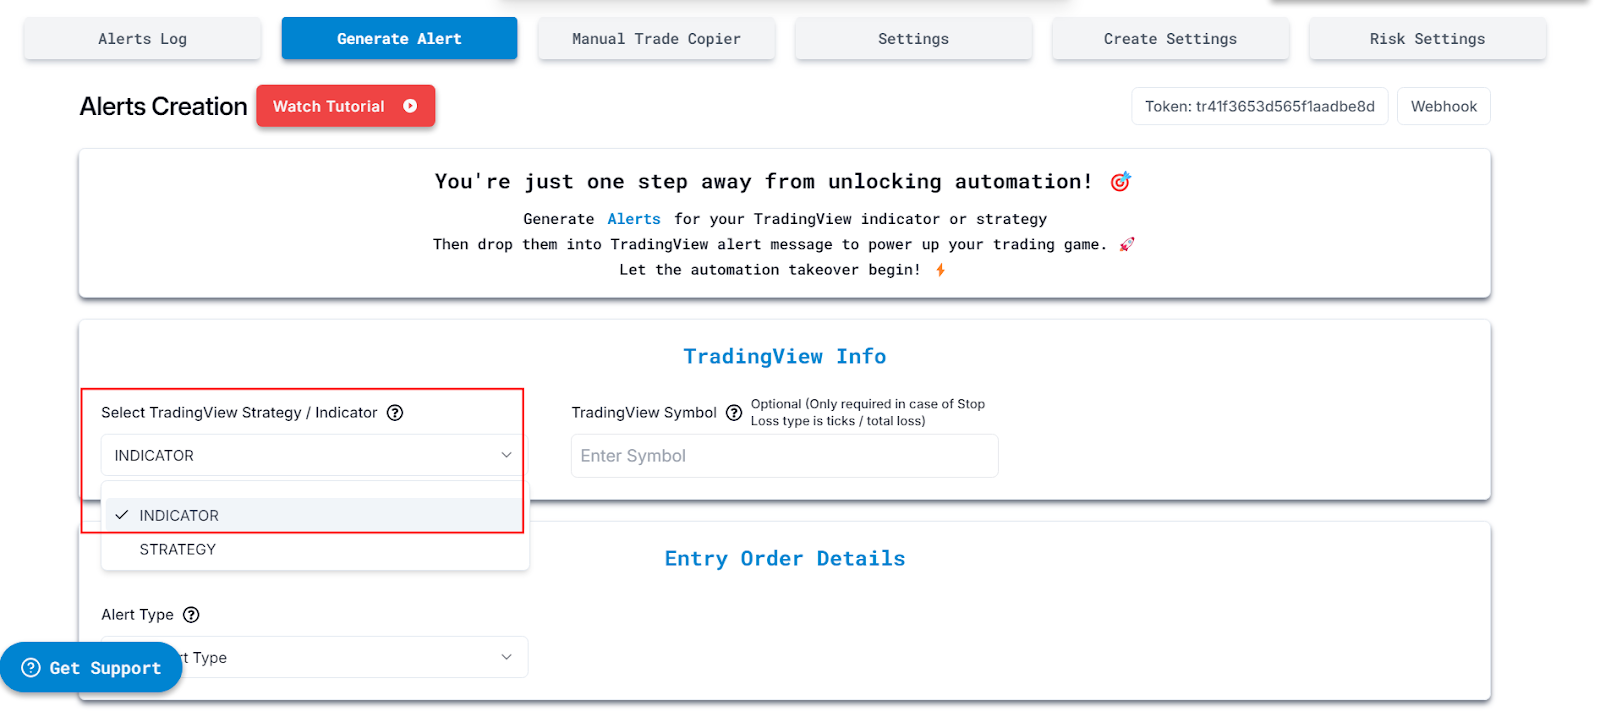
Step 1: Choosing Your Trading Setup
Before automation, decide whether you are using an Indicator-Based or Strategy-Based approach.
Indicator-Based Trading Setup
(Ideal for traders using RSI, Bollinger Bands, or other indicators to trigger trades.)
Select Your Indicator: Choose a TradingView indicator to automate (e.g., RSI, Moving Averages).
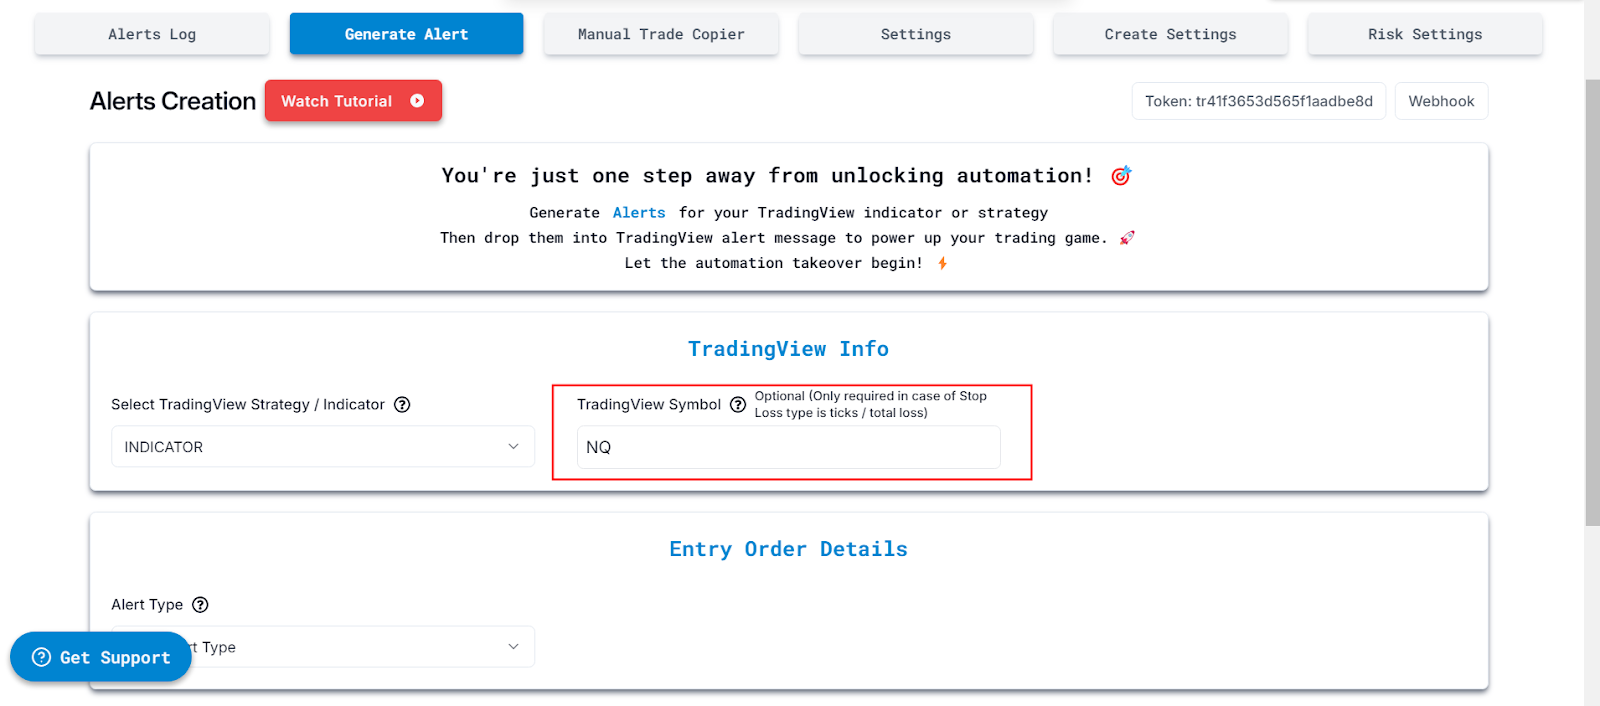
Step 2: Enter Trading Symbol:
This is where you tell PickMyTrade which asset you want to trade (like NQ, NDX, etc.). Filling this in is optional, but it’s needed if you want PickMyTrade to calculate stop loss and take profit based on tick size or total loss.
- If the symbol doesn’t exist or isn’t mapping correctly: You’ll need to set it up first in PickMyTrade. Only after that will trades happen on that symbol.
- Want to send an alert from one symbol and trade another? You can! For example:
- You’re using NQ on your TradingView chart for the alert.
- But you want the actual trade to happen on MNQ.
- In this case, just enter MNQ in the PickMyTrade symbol field. - What if you don’t enter a symbol here? No worries — PickMyTrade will simply take the trade based on whatever chart you’ve set up in TradingView for the alert.
Step 3: Select Alert Type:
Choose the type of trade action you want to automate:
Buy Alert:
- Cancels any open positions and open orders.
- Opens a new buy position.
Sell Alert:
- Cancels any open positions and open orders.
- Opens a new sell position.
Close Alert:
- Closes all open positions and open orders
- Does not open a new position.
- Buy: Enters a long position when the alert is triggered.
- Sell: Enters a short position when the alert is triggered.
- Close: Exits an existing position when the alert is triggered. If there are no open positions or orders, it does nothing.
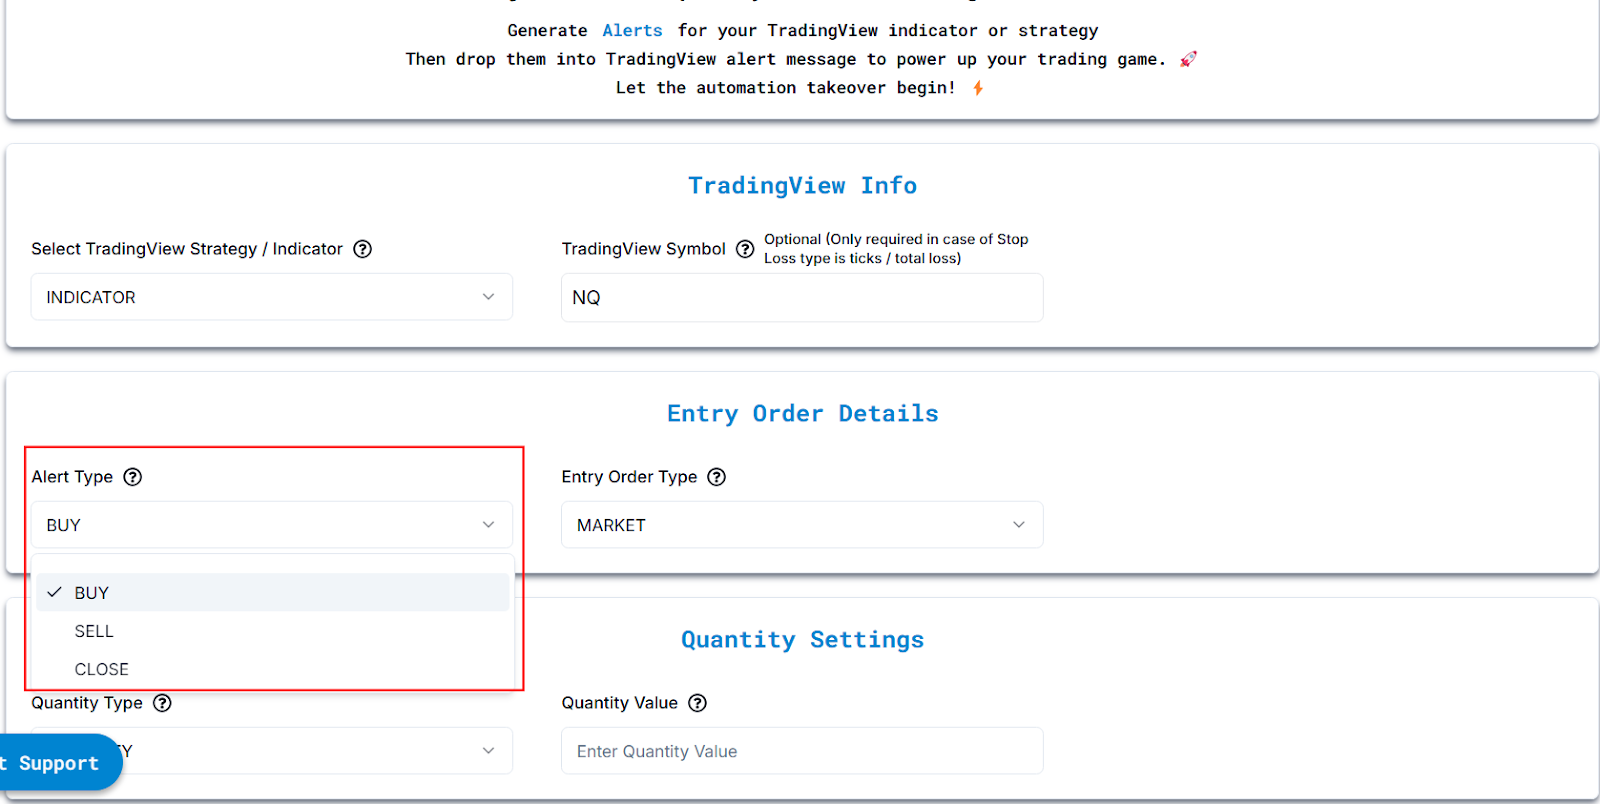
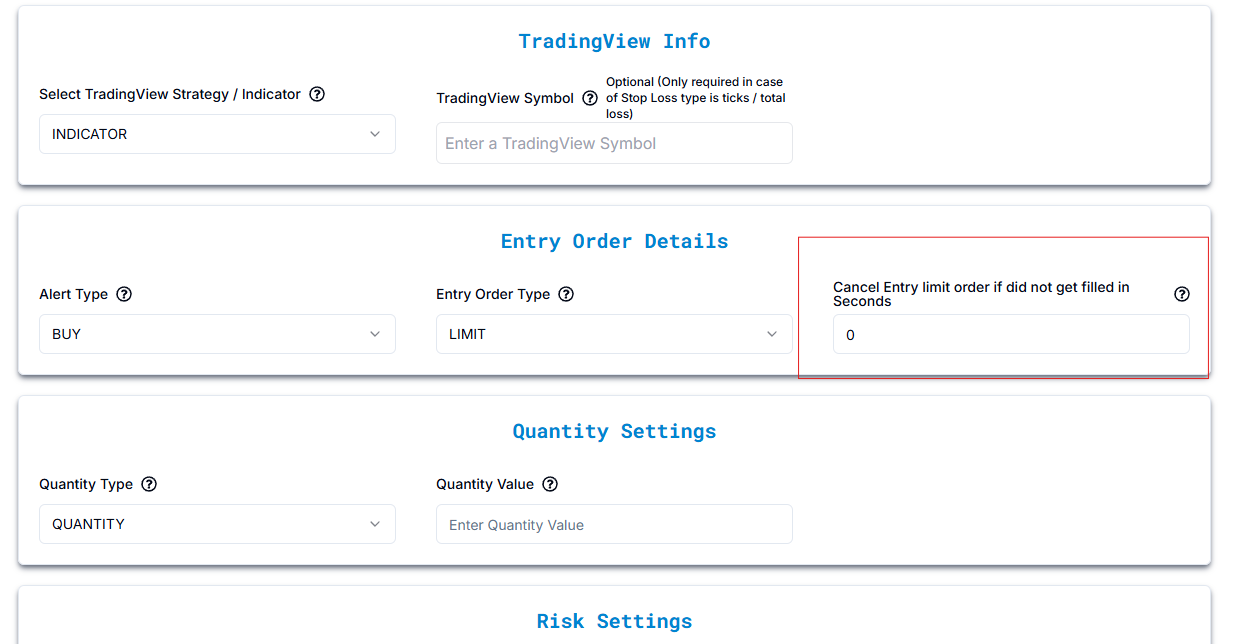
Step 4: Choose Entry Order Type:
Market Order:
- Definition: A market order is an order to buy or sell immediately at the current market price.
- Example: If NQ is at 21,891, and you place a market order to buy, it will execute immediately at or very close to 21,891. The order gets filled right away without waiting for any price changes.
Limit Order:
- Definition: A limit order is an order to buy or sell only when the price reaches a specific level you set. If the price doesn't reach that level, the order won't be filled.
- Example: If you want to buy NQ at 21,850, you set a limit buy order. This order will not execute unless the price of NQ drops to 21,850. If the price stays above 21,850, your order won’t be filled.
We use TradingView's {{close}} placeholder to set the limit price.
Stop Order (also called Stop Loss or Stop Entry):
- Definition: A stop order becomes a market order when the price reaches a specific trigger price. It’s often used for stop loss (to limit losses) or stop entry (to enter the market when a certain price is reached).
- Example:is at 21,891, and you place a buy stop order at 21,950, the order won’t execute until the price reaches 21,950. Once it does, the stop order becomes a market order and buys NQ at or near 21,950.
Market Order = Execute immediately at the current market price.
We use TradingView's {{close}} placeholder to set the stop price. If needed, you can replace it with any other available placeholder variable to suit your strategy. (Placeholder Explanation Click here)

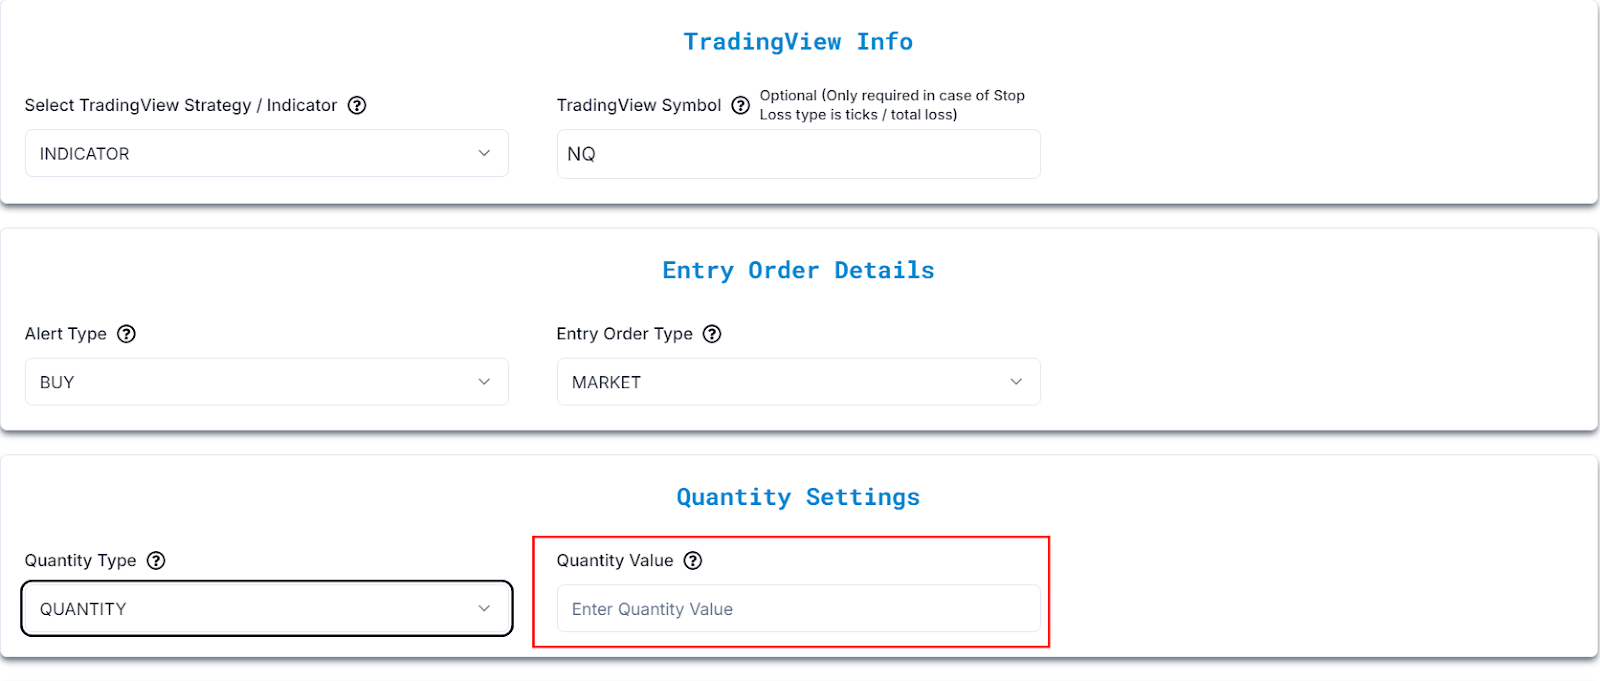
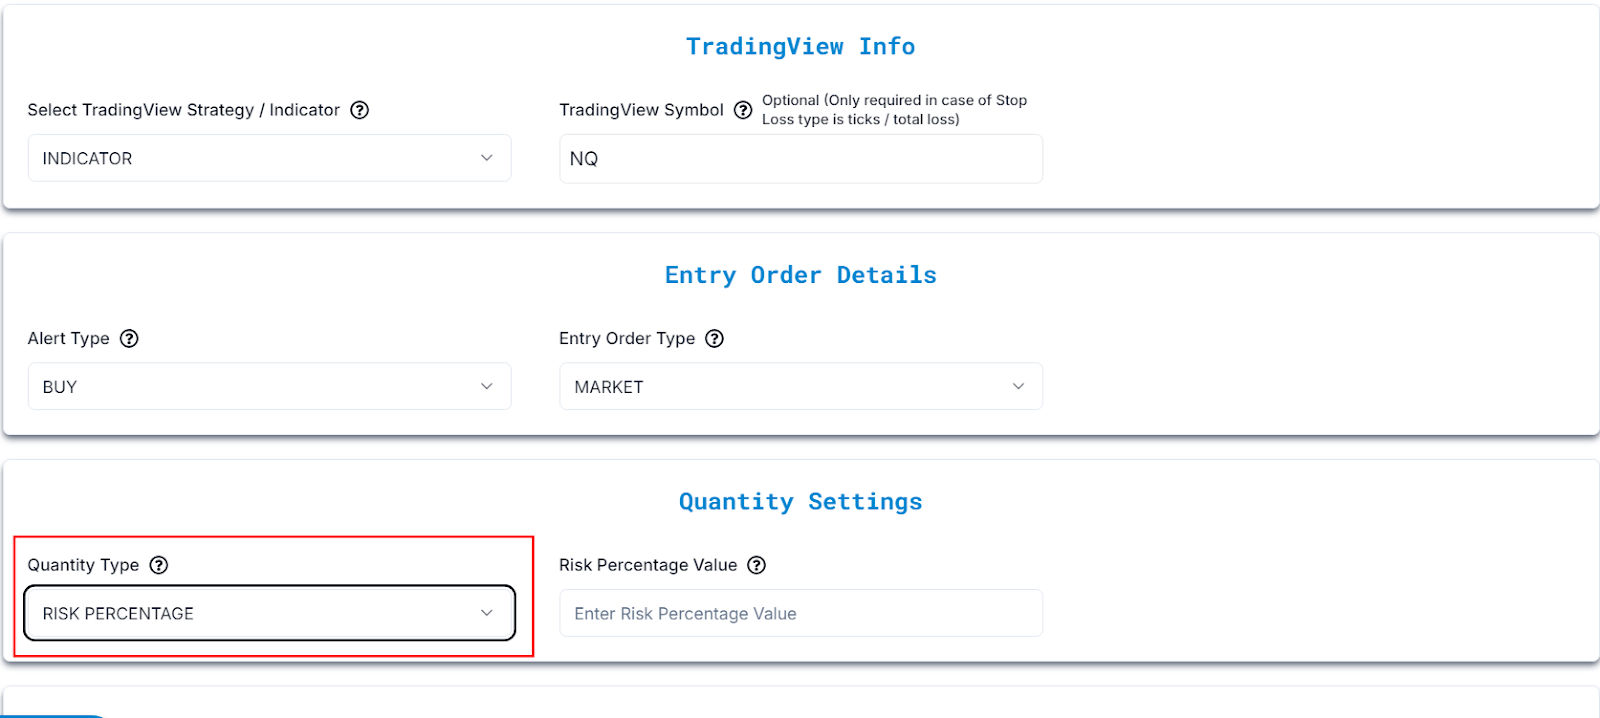
Step 5: Set Quantity Type:

Fixed Quantity: You manually specify the number of contracts to trade.
Risk Percentage: Trade size is automatically calculated based on your position size and stop loss distance, not just your account balance.
Example: If you set 2% risk, the system adjusts the trade size so that your total risk is 2% of the position size relative to stop loss distance, not 2% of your full account balance.
Stop Loss is mandatory when specifying Risk Percentage, as it determines trade size.
Position Sizing Calculation for NQ Futures
Position sizing is a critical aspect of risk management in futures trading. It ensures that each trade aligns with the trader’s risk tolerance and helps preserve account capital over the long term. This section outlines the method for calculating the appropriate position size when trading NQ futures.
i. Defining Account and Risk Parameters
Before placing a trade, it is essential to determine the account size and the percentage of capital the trader is willing to risk on a single trade:
- Account Balance: $10,000
- Risk Percentage Per Trade: 2%
- Maximum Risk Amount: The maximum dollar amount the trader is prepared to lose on one trade
Maximum Risk Amount = Account Balance × Risk Percentage
For an account balance of $10,000 and a risk percentage of 2%: $10,000 × 2% = $250
Therefore, the total allowable risk for this trade is $250.
ii. NQ Contract Specifications
Understanding the specifications of the NQ futures contract is crucial for accurate position sizing:
- Point Value: $20 per point per contract
- Minimum Tick Size: 0.25 points, equivalent to $5 per tick
iii. Trade Setup Example
Let’s consider a hypothetical trade with the following parameters:
- Current NQ Price: 20,653.25
- Stop-Loss Distance: 10 points from the entry price
- Take-Profit Target: 20 points from the entry price
iv. Risk Per Contract Calculation
The dollar risk per contract is determined by multiplying the stop-loss distance by the point value: Risk Per Contract = Stop-Loss Distance × Point Value
In this example:
10 points × $20 per point = $200
Hence, the risk per NQ contract is $200.
v. Position Size Calculation
The number of contracts to trade is calculated by dividing the maximum risk amount by the risk per contract: Position Size = Maximum Risk Amount ÷ Risk Per Contract
In this example:
$250 ÷ $200 = 1.25
Since futures contracts cannot be traded in fractional amounts, the position size is rounded down to 1
contract.
vi. Additional Considerations
- Lower Risk Percentages: If the risk percentage is reduced (e.g., to 1%), the risk amount decreases
accordingly:
$10,000 × 1% = $100
With a $200 risk per contract, the position size would be 0.5 contracts, which is not feasible. In such
cases, the trader may need to adjust their risk percentage or increase their account size to take the trade. - Minimum Position Size: If the calculated position size is less than one contract, the trade may not be executable. Traders should ensure their account size and risk tolerance align with the minimum position size required for NQ futures contracts.
viii. Conclusion
Accurate position sizing ensures that each trade’s potential loss remains within a defined percentage of the account balance. By considering account size, risk percentage, stop-loss distance, and contract specifications, traders can determine the optimal number of contracts to trade. This approach supports consistent risk management and long-term capital preservation.
Enter Quantity Value: Specify the number of contracts or risk percentage.
Step 6: Stop Loss and Take Profit Settings
In futures trading, Stop Loss and Take Profit orders are essential tools for effective risk management and profit protection. These orders automatically close positions when the market reaches specific price levels, helping traders maintain discipline and avoid emotional decision-making.
Stop Loss:
A Stop Loss is a predefined price level at which a position is automatically closed if the market moves unfavorably. This helps limit potential losses by exiting the trade once the price reaches a specified point.
Example:
Suppose a trader buys NQ at 21,891. They set a Stop Loss at 21,841. If the market drops to 21,841, the position will automatically close, capping the loss at that point.
Take Profit:
A Take Profit is a predetermined price level at which a position is automatically closed when the market moves favorably. This order locks in profits once the price reaches the target set by the trader.
Example:
A trader buys NQ at 21,890 and sets a Take Profit at 21,991. When the market rises to
21,991, the position automatically closes, securing the profit.
Using Stop Loss and Take Profit orders helps traders manage both risk and reward effectively, ensuring a
systematic approach to closing trades.
Enable Stop Loss & Take Profit: Select Yes to activate risk management settings.
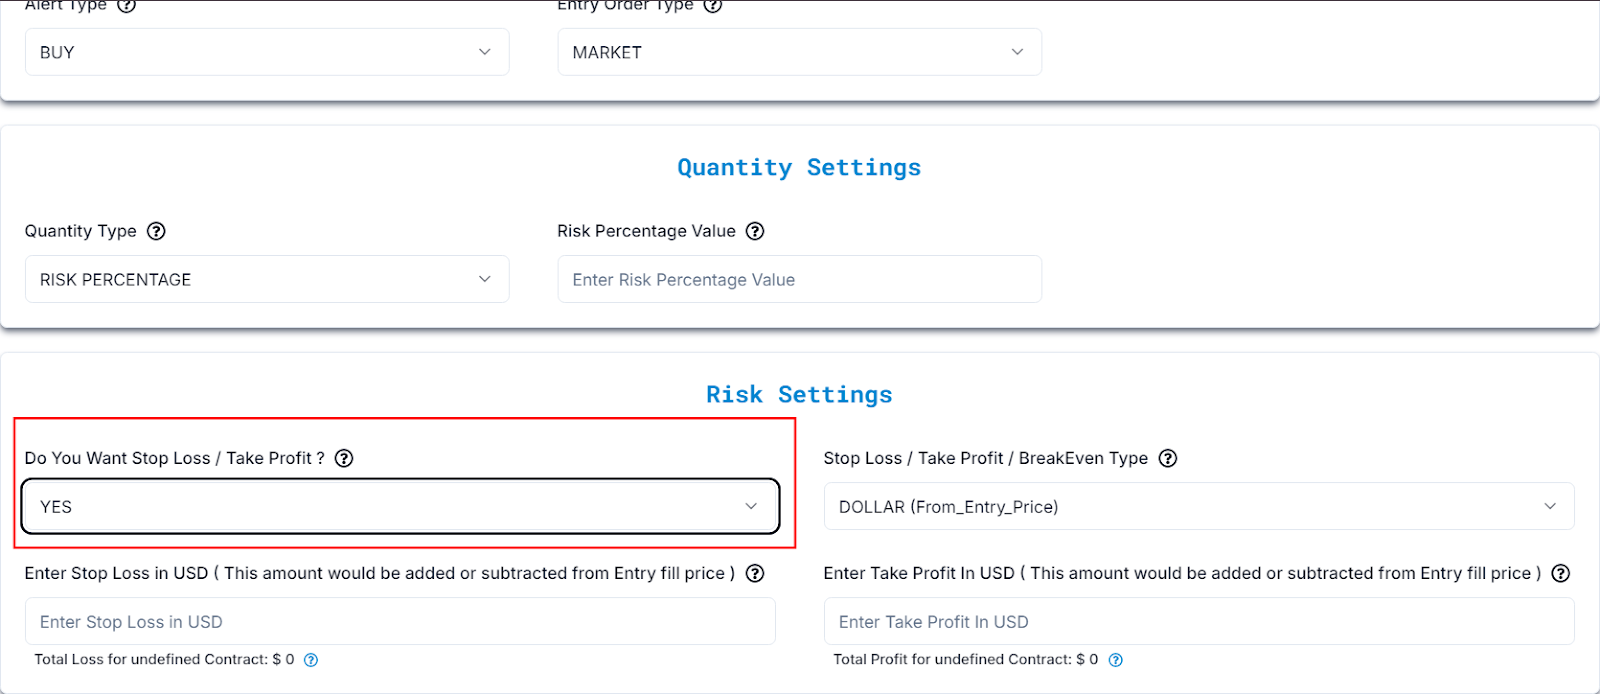
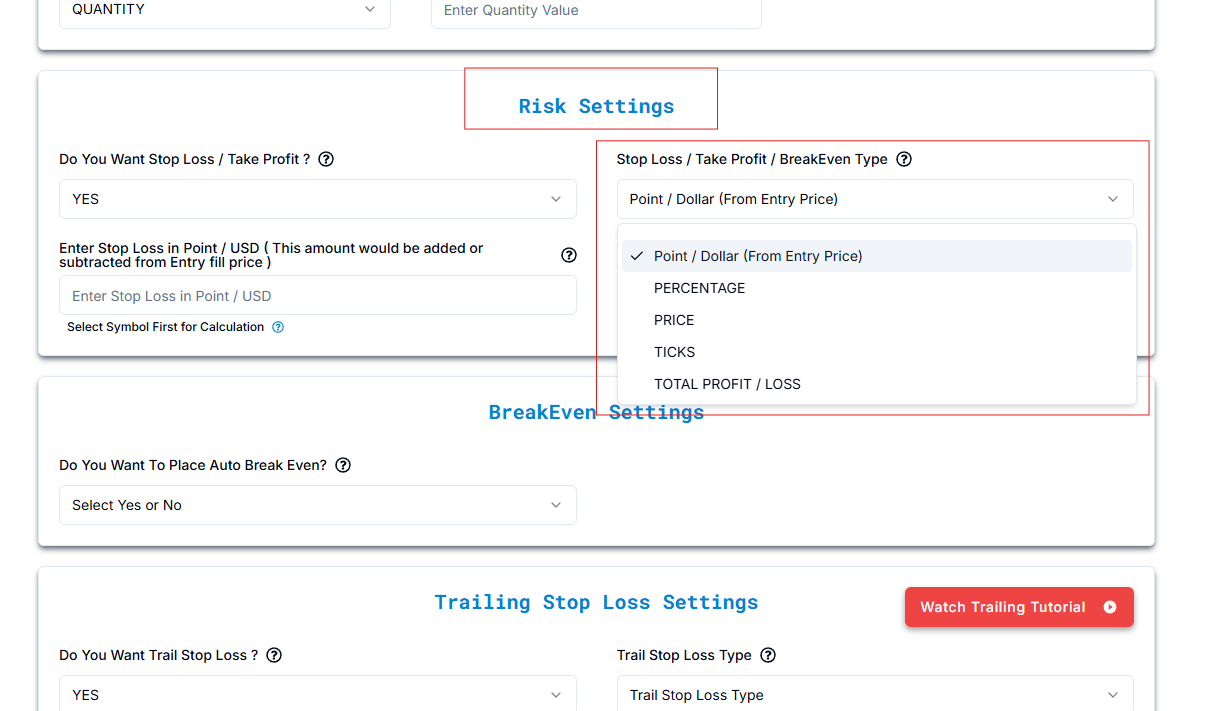
Stop Loss / Take Profit / BreakEven Type
Step 7: Risk Management Details
Types of Stop Loss and Take Profit Settings
When setting stop loss (SL) and take profit (TP) orders, different methods can be used to determine the exit points of a trade. Each method offers a unique approach to managing risk and locking in profits, based on factors like price movement, percentage, or total value. Here’s a clear explanation of each type:
Dollar (from entry):
This method sets the stop loss or take profit based on a fixed dollar amount from the
entry price. It’s a straightforward way to manage trades in terms of actual monetary risk and reward.
Example: If a trader enters a position at $21,000 and sets a stop loss $500 below the entry price, the
position will automatically close if the price falls to $20,500. Similarly, a take profit set $1,000 above
the entry price would close the position at $22,000.
Percentage:
Here, the stop loss and take profit are calculated as a percentage of the entry price.
This method keeps risk and reward proportional to the market price, making it useful for different price
levels.
Example: If the entry price is $21,000 and the stop loss is set at a 2% decrease, the position will close if
the price drops to $20,580. A take profit set at a 5% increase would close the position when the price
reaches $22,050.
Price:
This method sets stop loss and take profit at specific price levels. These price levels
are often chosen based on technical analysis, such as support and resistance zones.
Example: A trader entering a long position at $21,000 may set the stop loss at $20,800 (a support level) and
the take profit at $22,200 (a resistance level).
Ticks:
A tick is the smallest possible price movement for a futures contract. Using this method,
stop loss and take profit levels are set based on a specific number of ticks away from the entry price. This
is especially useful in fast-moving markets.
Example: In NQ futures, one tick equals 0.25 points and is worth $5. A stop loss of 20 ticks would represent
a $100 risk, while a take profit of 40 ticks would equal a $200 gain.
Total profit/loss:
This approach closes a position when a specific total profit or loss amount is reached,
regardless of the price level. It’s often used when focusing on overall account balance or total monetary
outcome.
Example: A trader might set a total loss limit of $500 and a total profit target of $1,000. Once either of
these thresholds is met, the trade automatically closes — no matter where the market price is at that time.
Each of these methods offers flexibility in managing trades and helps you align your strategy with your risk tolerance and goals. Choosing the right approach depends on your trading style, market conditions, and how you prefer to manage risk and reward.
Step 8: Stop Loss / Take Profit / BreakEven Type
TradingView Symbol - NQ
( It will be common for all Stop Loss / Take Profit / BreakEven Type)
Dollar (From_Entry_Price)
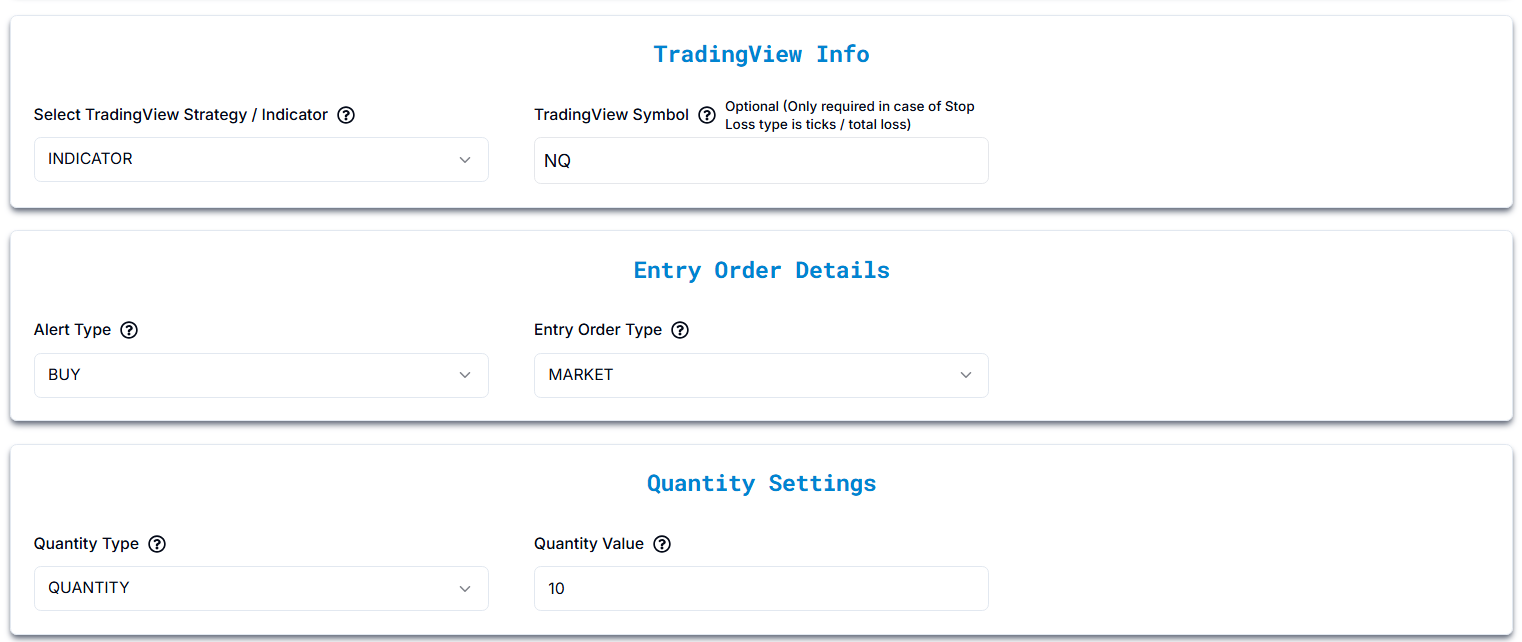
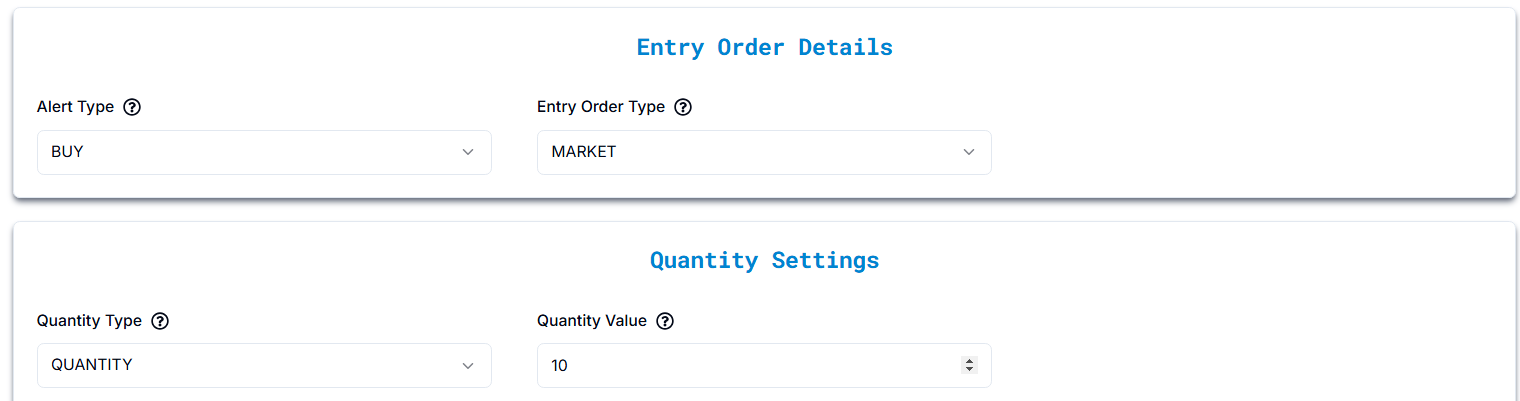
Entry Order Details
Alert Type: BUY — This means you’re placing an order to purchase.
Entry Order Type: MARKET — This type of order buys the contracts at the current market price right away.
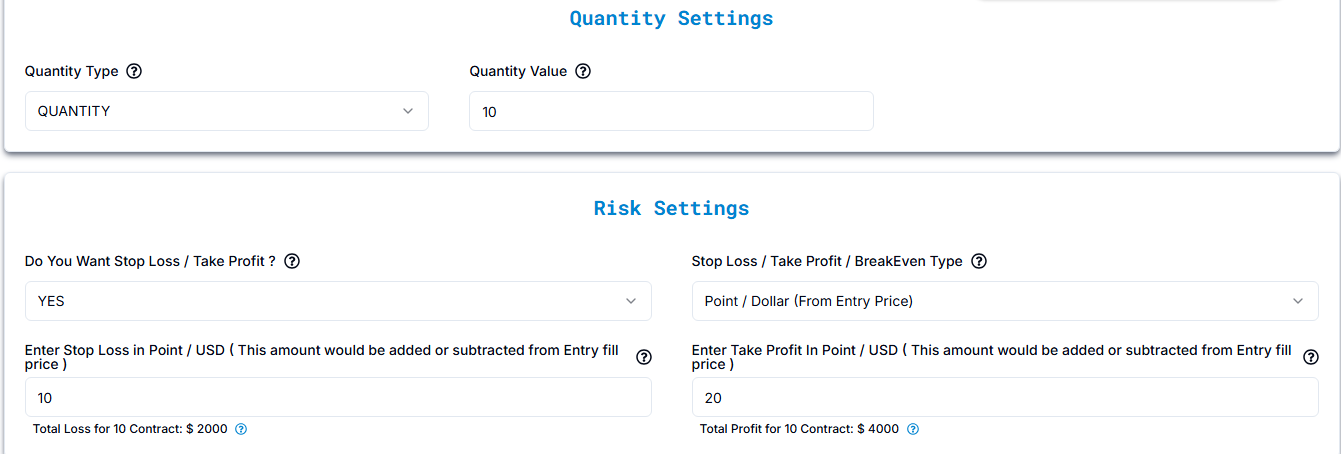
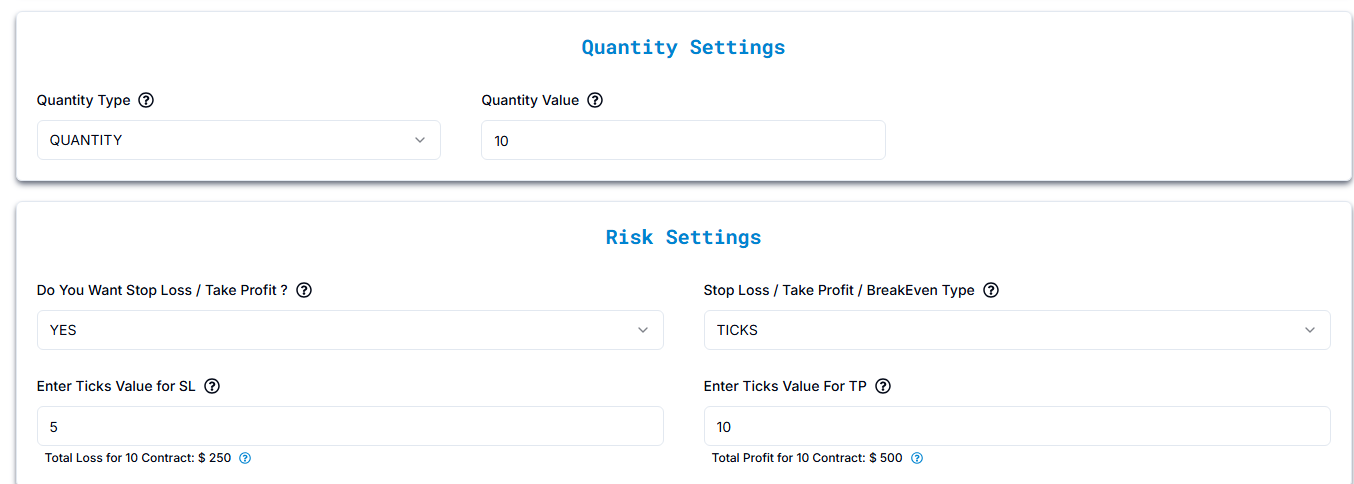
Quantity Settings
Quantity Type: QUANTITY — You’re specifying the number of contracts directly.
Quantity Value: 10 — This means you’re buying 10 contracts in this trade.
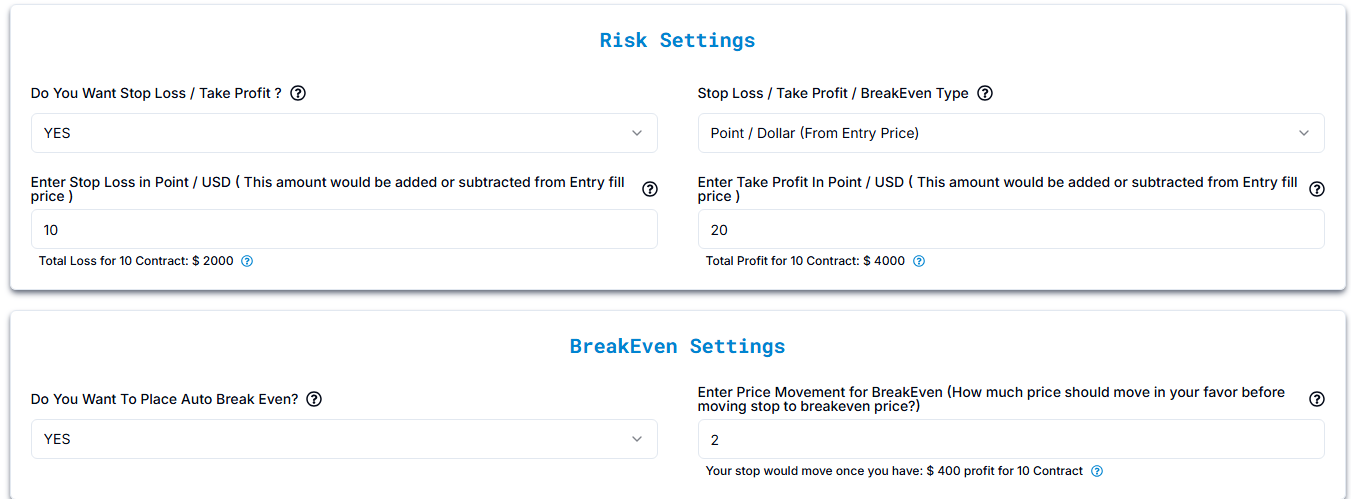
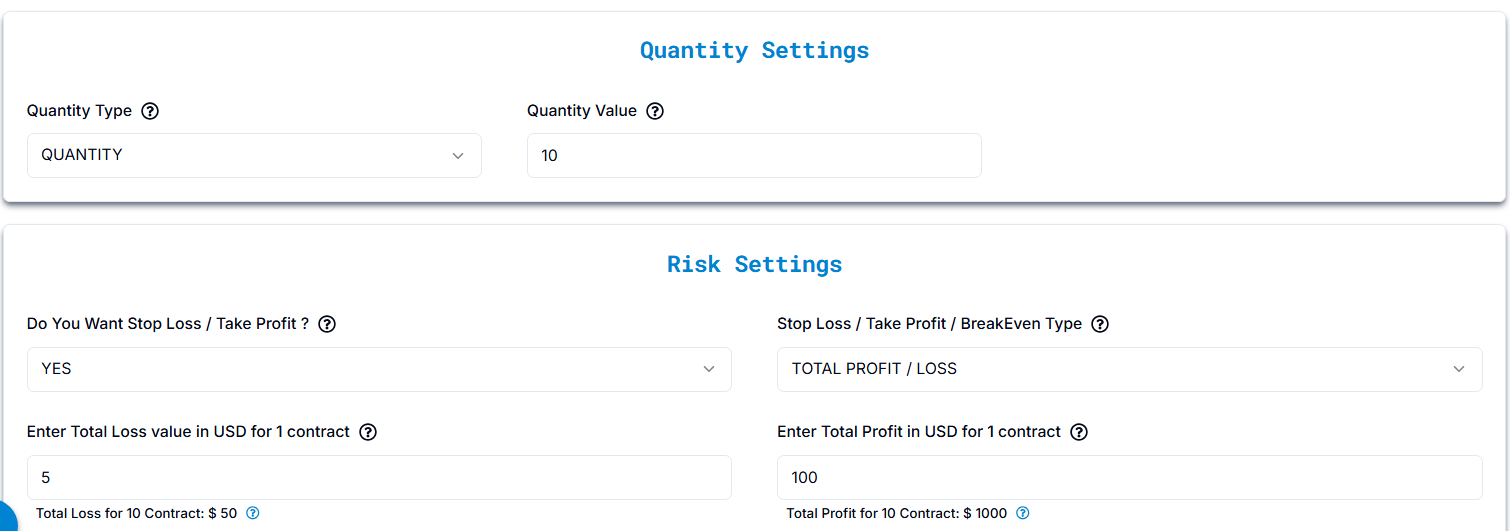
Risk Settings
Stop Loss / Take Profit Type: Point / Dollar (From Entry Price)
Stop Loss & Take Profit Calculation for 10 Contracts
- Stop Loss: 10 Points → $2,000 total loss for 10 contracts
- Take Profit: 20 Points → $4,000 total profit for 10 contracts
Example
- Buy NQ at 21,891
- Stop Loss: 10 Points below entry → New stop loss at 21,791
- Take Profit: 20 Points above entry → New take profit at 22,091
BreakEven Settings
- BreakEven activates after a 2-Point price movement in favor
Example:
- Buy NQ at 21,891
- BreakEven triggers at 21,893 (after a 2-Point move = $400 total profit for 10 contracts)
- Stop loss moves to entry price (21,891), ensuring no loss
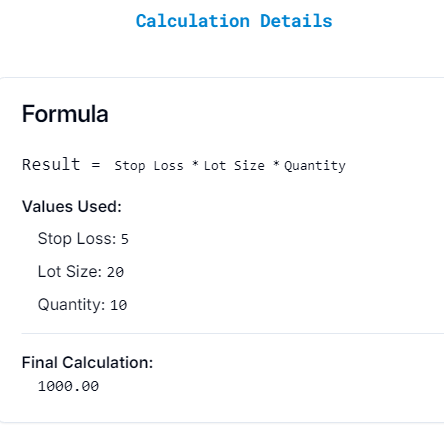
Calculation Details
Each field (Stop Loss, Take Profit, Trail Trigger, Trail Frequency) has a small question mark (?) icon next to it.
When you click the icon, it opens a "Calculation Details" popup, showing:
- The Formula used
- The Values Entered by the user
- The Final Calculation result
Stop Loss in USD:
- Formula: Result = Stop Loss USD * Lot Size * Quantity
- Example Calculation: (Same numbers for illustration) 5 * 20 * 10 = 1000.00 USD
Take Profit in USD:
- Formula: Result = Take Profit USD * Lot Size * Quantity
- Example Calculation: 10 * 20 * 10 = 2000.00 USD
Percentage
Entry Order Details
Alert Type: BUY — This means you’re placing an order to purchase.
Entry Order Type: MARKET — This type of order buys the contracts at the current market price right away.
Quantity Settings
Quantity Type: QUANTITY — You’re specifying the number of contracts directly.
Quantity Value: 10 — This means you’re buying 10 contracts in this trade.
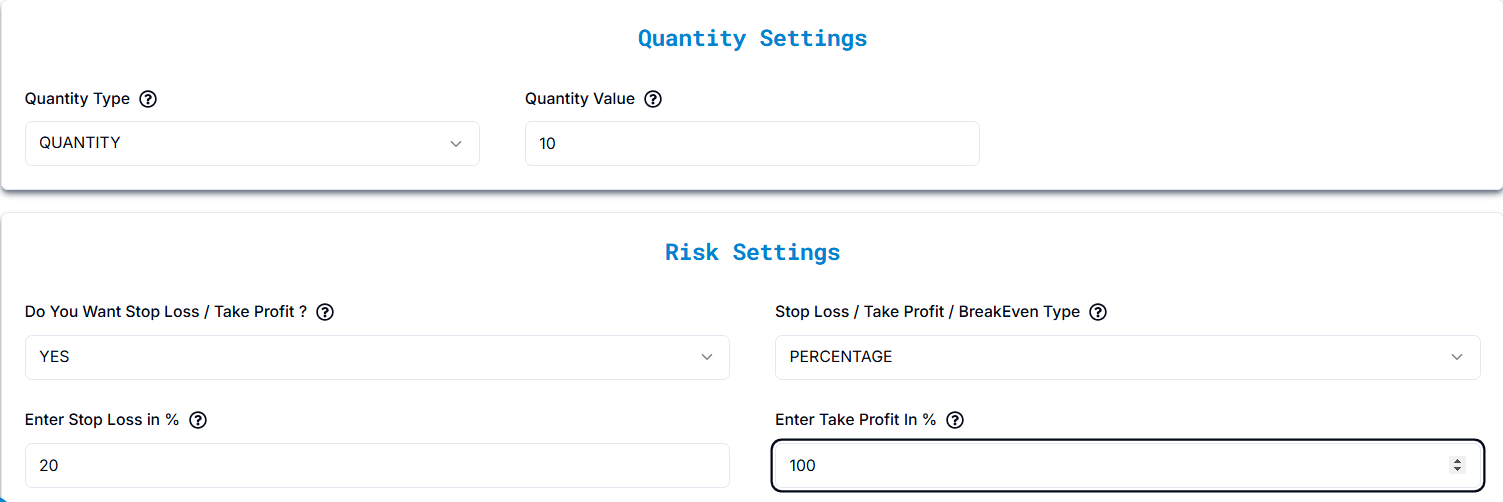
Risk Settings
Stop Loss / Take Profit Type: PERCENTAGE
Stop Loss & Take Profit Calculation (Percentage-Based)
- Stop Loss: 20%
- Take Profit: 100%
Example Calculation (Based on Entry Price of 21,891)
Stop Loss:
- 20% of 21,891 = 4,378.20
- Stop Loss Price = 17,512.80
Take Profit:
- 100% of 21,891 = 21,891
- Take Profit Price = 43,782
BreakEven Settings
BreakEven activates after a 2-Point price movement in favor
Example:
- Buy NQ at 21,891
- BreakEven triggers at 21,893 (after a 2-Point move = $400 total profit for 10 contracts)
- Stop loss moves to entry price (21,891), ensuring no loss

Price
Entry Order Details
- Alert Type: BUY — This means you’re placing an order to purchase.
- Entry Order Type: MARKET — This type of order buys the contracts at the current market price right away.
Quantity Settings
- Quantity Type: QUANTITY — You’re specifying the number of contracts directly.
- Quantity Value: 10 — This means you’re buying 10 contracts in this trade.
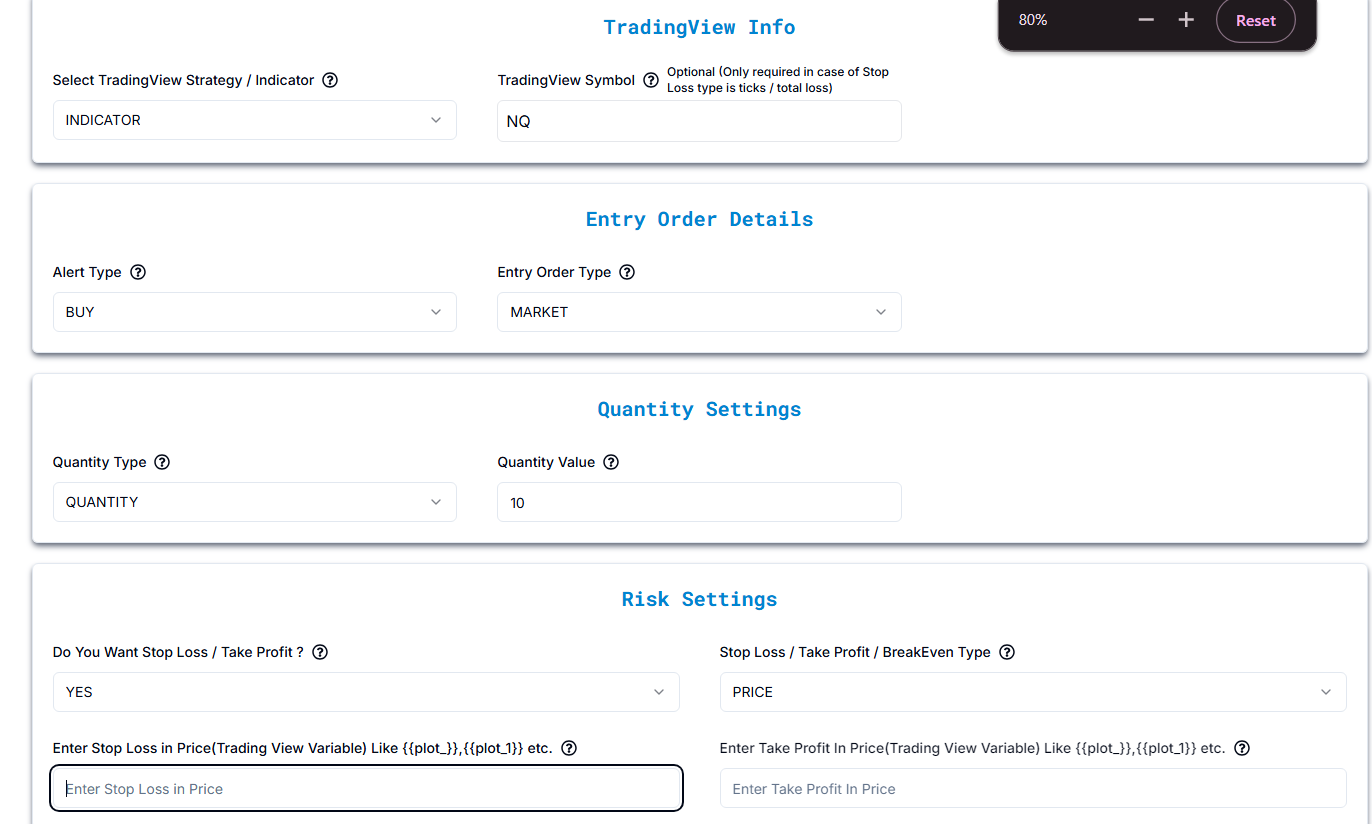
Risk Settings
- Stop Loss / Take Profit: YES
- Stop Loss / Take Profit / BreakEven Type: PRICE
- Stop Loss (Auto-Filled Price): Enter the stop loss price from your TradingView indicator. Use
TradingView variables like {{plot_1}}, {{plot_2}}, etc.
Example: If Stop Loss is 21,691, enter {{plot_1}} when creating the alert. - Take Profit (Auto-Filled Price): Enter the take profit price from your TradingView indicator. Use
TradingView variables like {{plot_1}}, {{plot_2}}, etc.
Example: If Take Profit is 22,091, enter {{plot_2}} when creating the alert.
Understanding {{plot_x}} Variables in TradingView
In TradingView, {{plot_0}}, {{plot_1}}, {{plot_2}}, etc., are placeholders that TradingView provides when you create an alert based on an indicator. These placeholders represent the different output values that the indicator shows on the chart.
- {{plot_0}} — The first value plotted by the indicator.
- {{plot_1}} — The second value plotted by the indicator.
- {{plot_2}} — The third value, and so on.
How They Work for Stop Loss & Take Profit
Let’s say your indicator plots two important levels:
- Stop Loss level
- Take Profit level
In this case:
- Stop Loss will be assigned to a variable like {{plot_1}}
- Take Profit will be assigned to a variable like {{plot_2}}
When setting an alert, you don’t have to enter fixed numbers (like 21,691) manually. Instead, you just select these placeholders:
- {{plot_1}} for Stop Loss
- {{plot_2}} for Take Profit
Example Alert Setup in TradingView
When creating an alert, enter this in the message box:
Stop Loss: {{plot_1}}, Take Profit: {{plot_2}}
Example Scenario
At the time of alert creation:
- {{plot_1}} = 21,691 (Stop Loss)
- {{plot_2}} = 22,091 (Take Profit)
When the alert triggers, you will receive this message:
Stop Loss: 21,691, Take Profit: 22,091
Important Note:
- The first plot you add in your indicator will always be accessible as {{plot_0}}.
- The second plot becomes {{plot_1}}, the third {{plot_2}}, and so on — following the order in which they appear in the indicator’s code or settings.
Ticks
Entry Order Details
Alert Type: BUY — This means you’re placing an order to purchase.
Entry Order Type: MARKET — This type of order buys the contracts at the current market price right away.
Quantity Settings
Quantity Type: QUANTITY — You’re specifying the number of contracts directly.
Quantity Value: 10 — This means you’re buying 10 contracts in this trade.
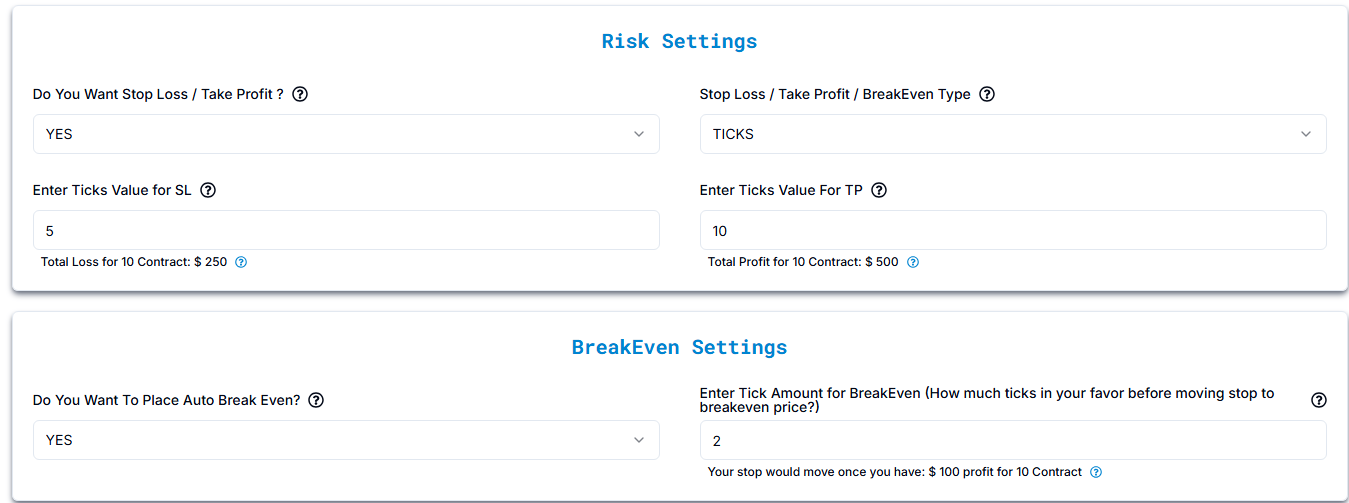
Risk Settings
Stop Loss (SL) Calculation
- Stop Loss Type: TICKS
- Stop Loss Value: 5 ticks below entry
Example Calculation
- Entry Price: 21,891
- Tick Size: 0.25 points per tick (For NQ futures)
- 5 Ticks Movement: 5 × 0.25 = 1.25 points
Stop Loss Price: 21,891 - 1.25 = 21,889.75
Loss Calculation:
- Each Tick Value: $5 per contract
- Total Contracts: 10
- Total Loss per Tick: 10 × $5 = $50
- Total Loss for 5 Ticks: 5 × $50 = $250
So if the price hits 21,889.75, the total loss is $250 for 10 contracts.
Take Profit (TP) Calculation
- Take Profit Type: TICKS
- Take Profit Value: 10 ticks above entry
Example Calculation
- Entry Price: 21,891
- Tick Size: 0.25 points per tick
- 10 Ticks Movement: 10 × 0.25 = 2.5 points
Take Profit Price: 21,891 + 2.5 = 21,893.5
Profit Calculation:
- Total Profit per Tick: $50 (10 contracts × $5 per tick)
- Total Profit for 10 Ticks: 10 × $50 = $500
So if the price hits 21,893.5, the total profit is $500 for 10 contracts.
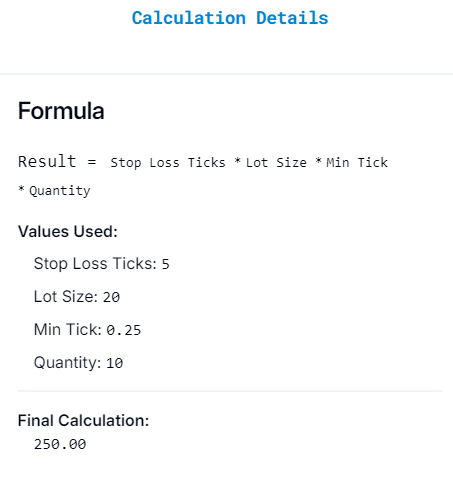
Calculation Details
Each field (Stop Loss, Take Profit, Trail Trigger, Trail Frequency) has a small question mark (?) icon next to it.
When you click the icon, it opens a "Calculation Details" popup, showing:
- The Formula used
- The Values Entered by the user
- The Final Calculation result
Stop Loss Calculation:
- Formula: Result = Stop Loss Ticks * Lot Size * Min Tick * Quantity
- Example Calculation: 5 * 20 * 0.25 * 10 = 250.00
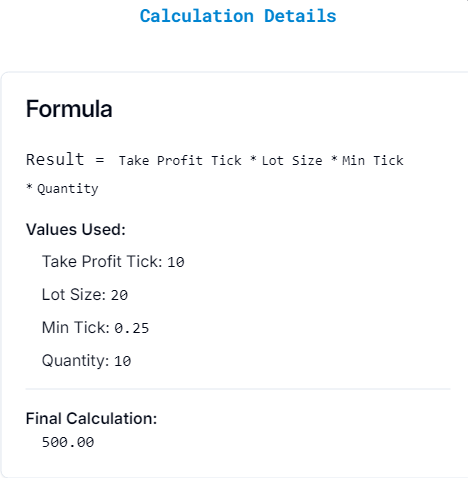
Take Profit Calculation:
- Formula: Result = Take Profit Tick * Lot Size * Min Tick * Quantity
- Example Calculation: 10 * 20 * 0.25 * 10 = 500.00
BreakEven Settings
BreakEven Activation Calculation
- BreakEven triggers after: 2 ticks in profit
- BreakEven Stop Loss Adjustment: Moves stop loss to entry price (21,891)
Example Calculation
- Entry Price: 21,891
- BreakEven Activation Price: 21,891.5 (after 2-tick move)
- Profit at 2 Ticks:
- 2 Ticks × $5 per contract = $10 per contract
- For 10 Contracts: $100 total profit - New Stop Loss Price After Activation: 21,891 (entry price)
Once price reaches 21,891.5, the stop loss moves to 21,891, protecting you from any potential loss if the market reverses.
Total Profit/Loss
Entry Order Details
- Alert Type: BUY — This means you’re placing an order to purchase.
- Entry Order Type: MARKET — This type of order buys the contracts at the current market price right away.
Quantity Settings
- Quantity Type: QUANTITY — You’re specifying the number of contracts directly.
- Quantity Value: 10 — This means you’re buying 10 contracts in this trade.
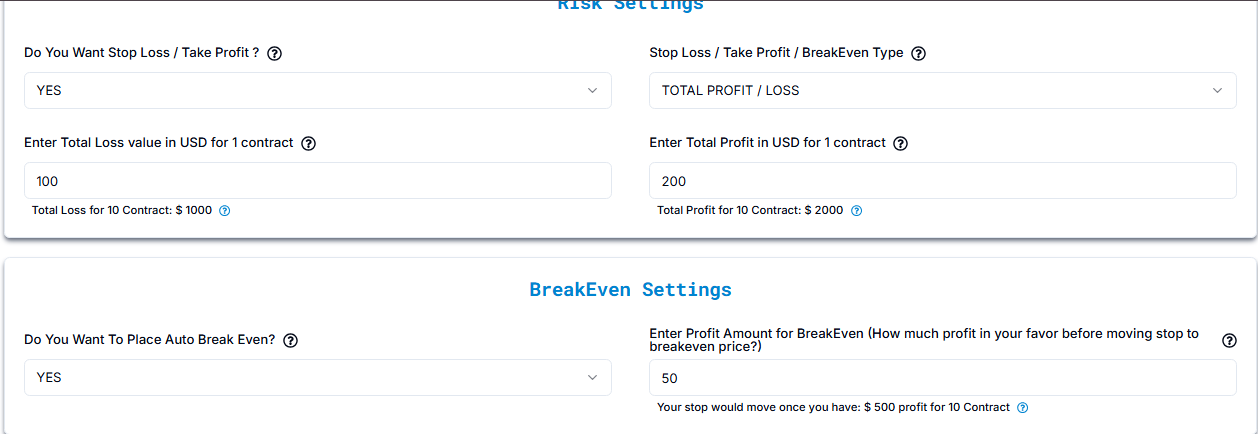
Risk Settings
- Stop Loss / Take Profit Type: TOTAL PROFIT / LOSS
- Stop Loss: $100 per contract
Example: Buy NQ at 21,891
Total Loss for 10 Contracts: $100 × 10 = $1,000 - Stop Loss Price:
1 point = $20 per contract
$100 ÷ $20 = 5 points - Take Profit: $200 per contract
Example: Buy NQ at 21,891
Total Profit for 10 Contracts: $200 × 10 = $2,000 - Take Profit Price:
1 point = $20 per contract
$200 ÷ $20 = 10 points Entry Price (21,891) + 10 points = 21,901
BreakEven Settings
- BreakEven Activation Price:
Example: Buy NQ at 21,891
1 point = $20 per contract
$50 ÷ $20 = 2.5 points
Entry Price (21,891) + 2.5 points = 21,893.5 - Total Profit to Trigger BreakEven:
$50 profit per contract × 10 contracts = $500 - Stop Loss Adjustment:
Once the price reaches 21,893.5, stop loss moves to entry price (21,891) to prevent any loss if the market reverses
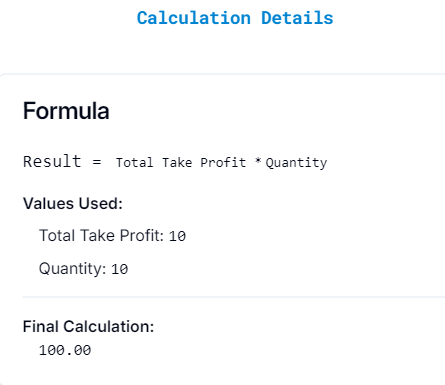
Calculation Details
Each field (Stop Loss, Take Profit, Trail Trigger, Trail Frequency) has a small question mark (?) icon next to it.
When you click the icon, it opens a "Calculation Details" popup, showing:
- The Formula used
- The Values Entered by the user
- The Final Calculation result
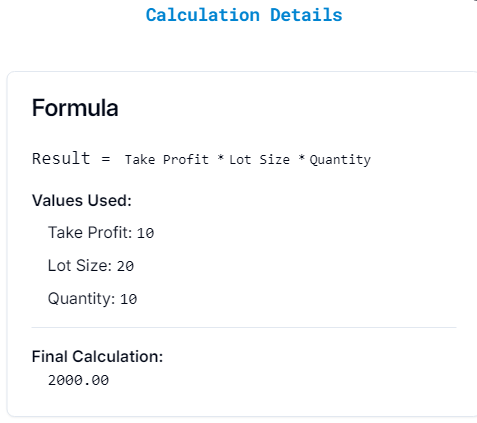
Total Profit in USD Calculation
Formula:
- Total Profit (USD) = Total Take Profit * Lot Size * Quantity
Values Used:
- Total Take Profit: 10
- Lot Size: 20
- Quantity: 10
Final Calculation:
- 10 * 20 * 10 = 2000.00 USD
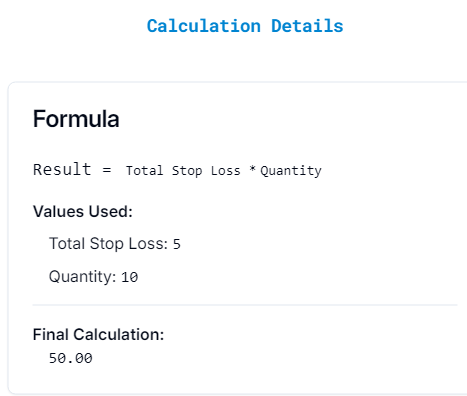
Total Loss in USD Calculation
Formula:
- Total Loss (USD) = Total Stop Loss * Lot Size * Quantity
Formula:
- Total Stop Loss: 5
- Lot Size: 20
- Quantity: 10
Final Calculation:
- 5 * 20 * 10 = 1000.00 USD
Trailing Stop Loss Settings
(Common for Dollar (From_Entry_Price), Percentage, Ticks, Total Profit/Loss)
Symbol: NQ
Quantity: 10 Contracts
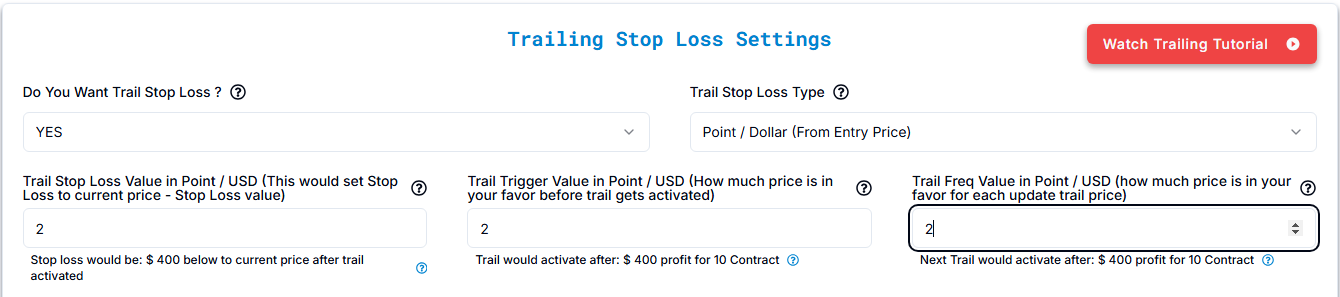
A. Trailing Stop Loss in Point / Dollar (From Entry Price)
Do You Want Trail Stop Loss?
- Option: YES / NO
- Purpose: Enables or disables the trailing stop loss feature.
Trail Stop Loss Type:
- Type: Point / Dollar (From Entry Price)
Trail Stop Loss Value:
- Value: Points / USD below the current price after trail stop activates
- Example: Let’s say the current price = 100 and the Trail Stop Loss Value = 20.
- Once activated, the stop loss will always stay 20 points below the current price.
Trail Trigger Value:
- Value: How much price must move in your favor before the trailing stop activates
- Example: With a Trail Trigger Value of 5 points, the trailing stop will only activate when the price reaches 105 (current price 100 + 5 points).
Trail Frequency Value:
- Value: How much price must move in your favor for each trailing stop update
- Example: With a Trail Frequency Value of 2 points, once the price hits 105 and the trailing stop
activates:
- At 105: Stop loss sets to 105 - 20 = 85
- At 107: Price moves up by 2 points, so the stop loss adjusts to 107 - 20 = 87
- At 109: Another 2-point move → stop loss updates to 109 - 20 = 89
- If the price reverses and hits 89, the position closes and locks in the profit/loss.
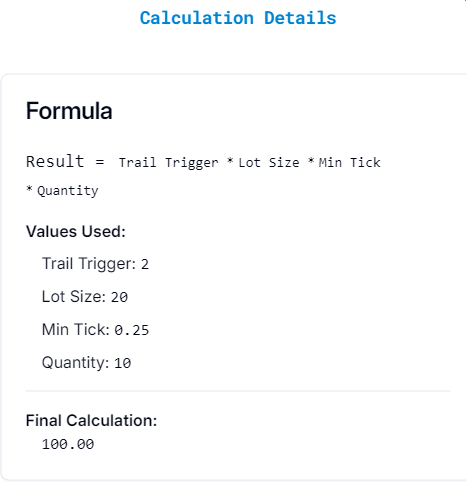
Calculation Details
Each field (Stop Loss, Take Profit, Trail Trigger, Trail Frequency) has a small question mark (?) icon next to it.
When you click the icon, it opens a "Calculation Details" popup, showing:
- The Formula used
- The Values Entered by the user
- The Final Calculation result
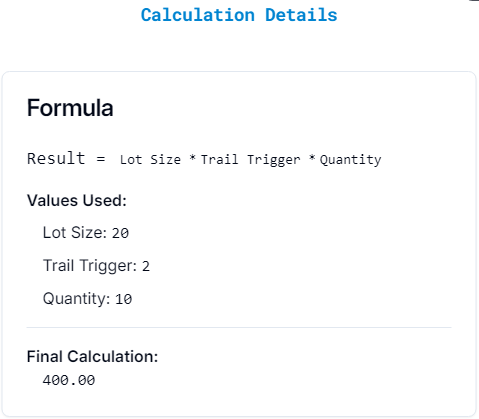
Trail Trigger in USD:
- Formula: Result = Trail Trigger USD * Lot Size * Quantity
- Example Calculation: 2 * 20 * 10 = 400.00 USD
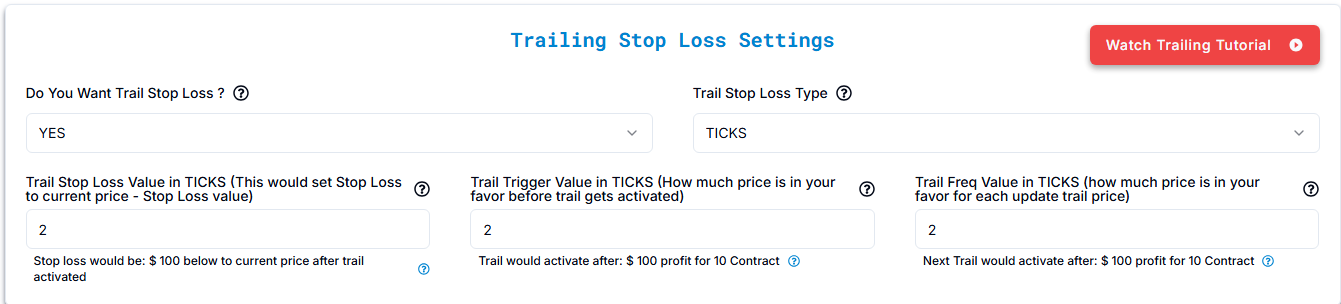
B. Trailing Stop Loss in TICKS
Do You Want Trail Stop Loss?
- Option: YES / NO
- Purpose: Enables or disables the trailing stop loss feature.
Trail Stop Loss Type:
- Type: TICKS
Trail Stop Loss Value:
- Value: Number of ticks below the current price after the trailing stop activates.
- Example: Let’s say 1 tick = $10 per contract and Trail Stop Loss Value = 8 ticks.
Once activated, the stop loss will always stay 8 ticks below the current price.
For 10 contracts, this equals a total loss of: 8 ticks × $10 per contract × 10 contracts = $800 total loss.
Trail Trigger Value:
- Value: How much price must move in your favor (in ticks) before the trailing stop activates.
- Example: With a Trail Trigger Value of 10 ticks, the trailing stop will only activate when the price
moves 10 ticks in your favor.
1 tick = $10 per contract, so for 10 contracts:
10 ticks × $10 per contract × 10 contracts = $1,000 total profit.
Trail Frequency Value:
- Value: How often the stop loss updates in ticks (i.e., how much price must move in your favor for each trailing stop adjustment).
- Example: With a Trail Frequency Value of 2 ticks, once the trailing stop activates:
At 10 ticks in profit: Stop loss sets to Current Price - 8 ticks.
At 12 ticks in profit: Price moves up by 2 ticks, so the stop loss adjusts by 2 ticks as well.
At 14 ticks in profit: Another 2-tick move → stop loss updates again. ticks as well.
If the price reverses and hits the adjusted stop loss level → the position closes, locking in the profit or loss.
- Example: 2 Ticks = $100 total profit for 10 contracts
Calculation Details
Each field (Stop Loss, Take Profit, Trail Trigger, Trail Frequency) has a small question mark (?) icon next to it.
When you click the icon, it opens a "Calculation Details" popup, showing:
- The Formula used
- The Values Entered by the user
- The Final Calculation result
Trail Trigger Calculation:
- Formula: Result = Trail Trigger * Lot Size * Min Tick * Quantity
- Example Calculation: 2 * 20 * 0.25 * 10 = 400.00
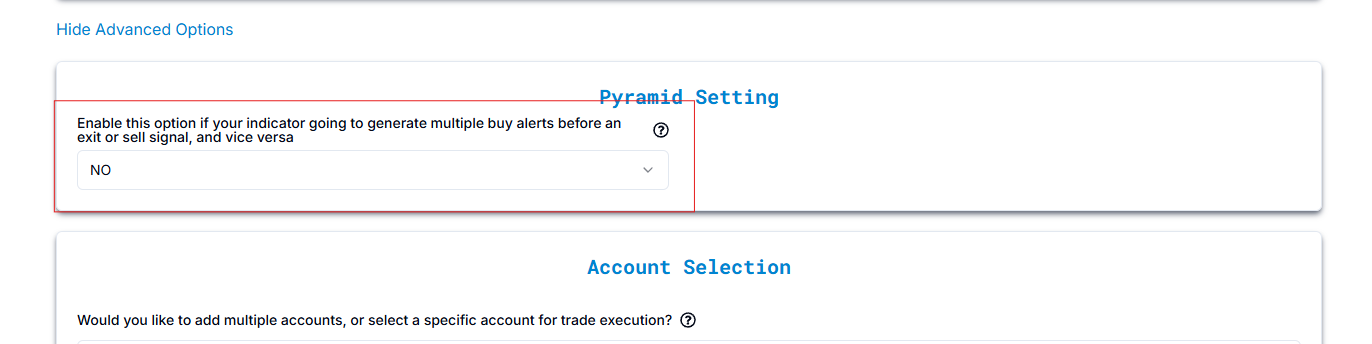
Pyramid Mode (Multiple Positions)
By default, Pyramid Mode is False, meaning:
- If a buy alert comes and there is already an open buy/sell position, it will cancel the existing position before opening a new one.
- If a sell alert comes and there is already an open buy/selll position, it will cancel the existing position before opening a new one.
If Pyramid Mode is True:
- Buy alerts will not cancel existing buy positions.
- Sell alerts will not cancel existing sell positions.
- Allows stacking positions in the same direction.
Enable Multi-Account Trading: Select Yes if you want to execute trades across multiple accounts.
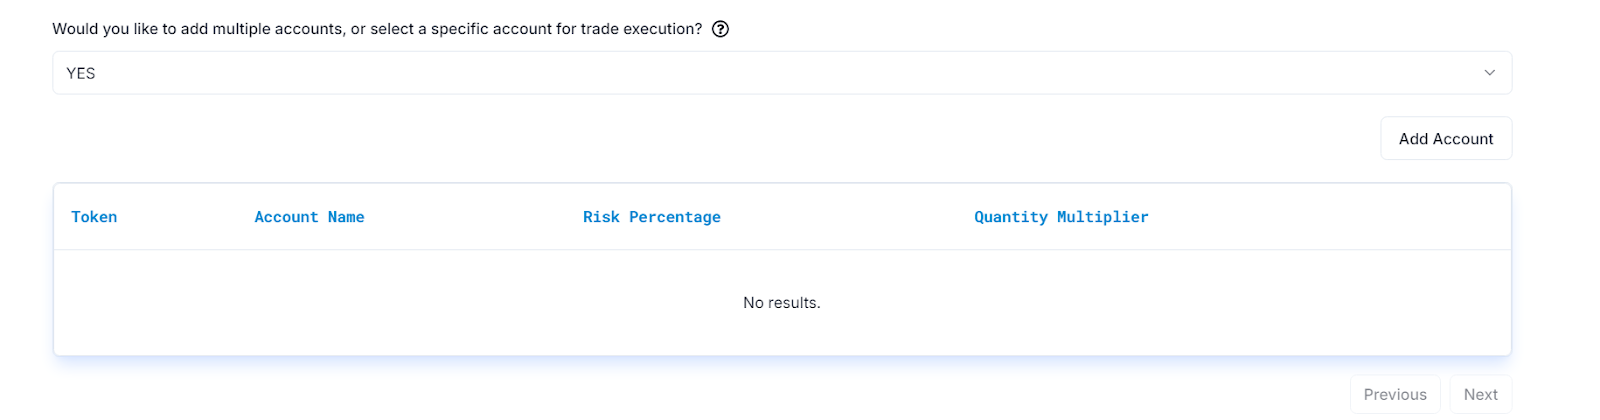
Add Multiple Accounts for Trade Execution
| Setting | Explanation | Example |
|---|---|---|
| Add Account | Select Yes if you want to add multiple accounts for trade execution. This allows you to execute trades across different accounts. | Example: If you have two Apex accounts (e.g., Apex_123456 and Apex_789012), you can add them here to execute trades on both accounts simultaneously. |
| Token | Enter the PickMyTrade Token for the account. This is a unique identifier required for integration with PickMyTrade. | Example: The token could be a unique string such as 41f3653d565f1aadbe8y for your first account and 41f3653d565f1aadbe8g for your second account. |
| Account Name | Enter the account name exactly as it appears in your trading platform (e.g., Apex account names). | Example: You can name your accounts Apex_123456 for your primary account and Apex_789012 for your secondary account. |
| Risk Percentage | Enter the Risk Percentage for the account. This sets the percentage of your capital to risk for each trade on this account. | Example: Setting a risk percentage of 2% for Apex_123456 and 1.5% for Apex_789012 means that each trade will risk 2% of your total capital in the first account and 1.5% in the second account. |
| Quantity Multiplier | Enter the Quantity Multiplier. This value allows you to adjust the number of contracts based on the account’s configuration. | Example: If your multiplier is 1.5 for Apex_123456 and 1.0 for Apex_789012, then your first account will trade 1.5 times the default contract size, while the second will trade the standard amount. |